|
Many people have the mistaken impression that it is not possible to extract useful power from what they call “gravity”. They say that a falling weight can indeed do useful work, but then the weight has to be raised again in order to perform more useful work. This is, of course, a very mistaken impression, especially since useful work has been produced by practical devices for many centuries now. Water flows downhill under the influence of “gravity” and that water flow powers water mills which grind grain, operate bellows and power hammers. It also powers massive hydro-electric schemes producing many megawatts of electrical energy, so please don’t tell me that “gravity” can’t do useful work.
The argument about a falling weight needing to be raised up again before it can do ‘useful work’ again certainly sounds reasonable, but in 1939 William Skinner of America demonstrated that it is possible to have a weight fall continuously without the weight getting nearer to the ground. Initially, that sounds impossible, but it is not impossible if the weight is always falling sideways. William produced substantial power by moving the top of a weighted shaft around in a circle. That unbalances the weight and it falls sideways to reach a stable position. But the weight never gets there because the top of the shaft is moved continuously to prevent that happening: 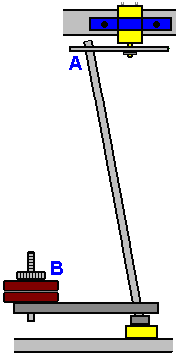 William’s video is here and the principle has been taken up recently in the patent application US2014/0196567 of David W. John who shows several variations of that basic arrangement, including this one: 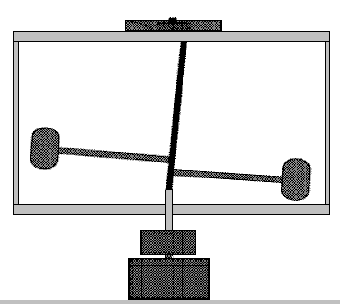 This is the same as William Skinner’s method as the top of the shaft is moved in a circle and the weights follow the top of the shaft, falling continuously in a circular path at a far greater level of power than is required to move the top of the shaft. This demonstrates very clearly that it is certainly possible to extract useful work from what we call “gravity”, (in passing, there is no such thing as ‘gravity’ which pulls things towards the Earth, the reality is that the effect is actually an imbalance in the universal energy field in which we live, and that imbalance is a push towards the Earth as Newton correctly deduced. The universal energy field is called the zero-point energy field, the aether or any one of many other names). This, however, is only one of the factors involved in the energy gain produced by this generator as we have inertia and acceleration to consider as well. Let’s start with acceleration. There is an excellent lecture by Mike Waters here although the video quality is not by any means perfect.  Mike describes a simple wind turbine design of his which is highly efficient. He points out that as wind flows past an obstruction, it speeds up. He uses this fact to boost the performance of his wind turbine. Next, he puts the turbine blades as far from the axle as possible in order to get the largest lever arm for the wind force on the turbine blades. The design is a simple circular disc forming the obstacle for the wind, and turbine blades mounted around the circumference of the disc: 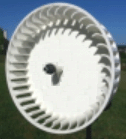 The performance is most impressive with the generator producing power at a wind speed of just 1 kilometre per hour. To understand that, consider the fact that you can walk a kilometre in about ten minutes, so a wind speed of one kilometre per hour is only one sixth of your walking speed. Mike points out that the force turning the generator is proportional to the square of the wind velocity. That means if the wind speed doubles, then the force powering the generator goes up by a factor of four. If the wind speed catches up to your walking speed, then his generator output would increase by a factor of 36 times. So the main point here is that any acceleration boosts the generator output. So, just to get the operation clear in your mind, Mike’s wind turbine has the wind flowing directly on to the circular plate and to get past it, the wind accelerates sideways to flow around the plate and continue on along its normal flow path. However, the wind accelerates as it moves sideways and so is moving faster than the general wind speed when it reaches the turbine blades at the edge of the disc and so provides a substantial energy boost to the rotor disc. That action, of course, is not limited to wind generators. Engineers get the impression that a flywheel is just a storage device for kinetic energy and while a flywheel does indeed store energy, even to the extent that some city busses are powered by a flywheel, that is not the only important thing that flywheels do – they also rotate on an axle. Big shock ! Flywheels rotate on a pivot point. I would be very surprised if you didn’t already know that. But, are you aware that rotation at a constant speed produces continuous acceleration? Like the William Skinner design, it takes some explaining as to how a constant rotational speed produces acceleration. It’s all Newton’s fault !! Newton pointed out that if something is started moving, then it will continue moving in a straight line until some force or other acts on it to change its movement. This is a little difficult to understand as we live on a planet whose ‘gravity’ affects all moving objects very considerably, and the air surrounding the planet also acts on moving objects very considerably. We are so used to these things that we find it difficult to understand that in deep space an object will tend to continue moving in a straight line for a very long time indeed. Suppose then, that we have a flywheel and we have glued a block of steel to the rim. We spin the flywheel at a speed so high that the glue joint breaks and the steel block flies off on its own. It would be like this: 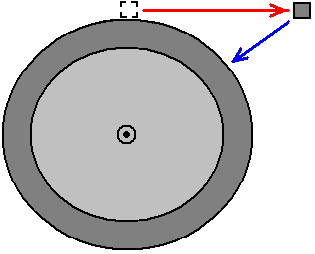 The steel block flies off (horizontally in this case) as shown by the red arrow. That is what the steel block would do if left alone and not bothered by any other forces. But, if the glue joint did not fail, being attached to the flywheel, the steel block would be in the position shown by the blue arrow. University professors who specialise in this subject, describe this as “an acceleration” inwards along the blue line, so although the flywheel is rotating at a constant speed, every molecule of steel in the flywheel is constantly accelerating inwards and acceleration produces an increase in energy. The larger the flywheel, the greater the effect There is also another factor which is often ignored and that is inertial impact (the impact of two things colliding) and the energy gain from that is substantial. To give you some idea of how powerful this is, if you spin an unbalanced rotor it produces twenty times more thrust than the engine of a jet aircraft. For example, John Bedini has run a small motor/generator in self-powered mode for years on end, using both a small flywheel and the inertial drive of a pulsed DC motor: 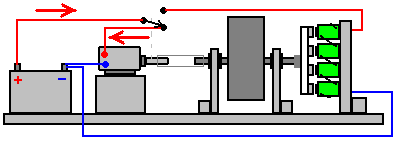 The DC motor is provided power in three short pulses per turn of the motor shaft, the switching being performed by contacts on the motor shaft. The timing of the pulses is like this: 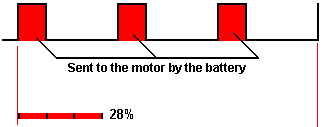 We need to be careful not to underestimate the effect of inertial impulses, and John’s pulsing of his DC motor causes it to keep the flywheel spinning for three times longer than the duration of the pulses. There is a distinct inertial gain in energy when the motor is suddenly powered and applies a short thrust to the flywheel axle. In passing, it might be noticed that while those motor pulses are only there for a quarter of the time, the motor is receiving some 3000 pulses per second, so the energy gain from the pulsing seems almost continuous.  So, overall, we can get an energy gain from ‘gravity’ and from acceleration and from inertia. Chas Campbell of Australia who is experienced in building successful gravity-powered generators has very kindly agreed to explain to us, step by step, how to construct a self-powered generator of his latest design. Initially, Chas built a very successful motor/generator design which is described in chapter 4 and which looks like this: 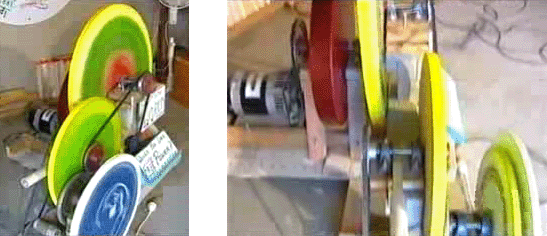 Driven by an AC mains motor, once running, this generator can be powered from its own output and when powered like that it can also supply power for other pieces of equipment. That generator gains power from the acceleration effect of the flywheel and from the inertial impacts of the mains motor pushing one hundred times per second. In my opinion, it would probably work more effectively if powered through a mains dimmer light switch. Those switches are available in powers of up to one kilowatt and they can be turned down slightly to give a more noticeable On/Off effect for those one hundred pulses per second. However, Chas has very kindly agreed to share his latest flywheel design so that anyone who wants can make and use one for himself. As people’s circumstances and skill levels vary so much around the world, we will explain three different ways to build his design – two ways when building in steel and one when building using wood. Chas’ latest design uses either two or three flywheels – one large one to drive the output generator and either one or two small flywheels to keep the large flywheel rotating. An additional inertial effect is produced as the small flywheels use a drive mechanism which is not continuous. The arrangement looks like this in broad outline: 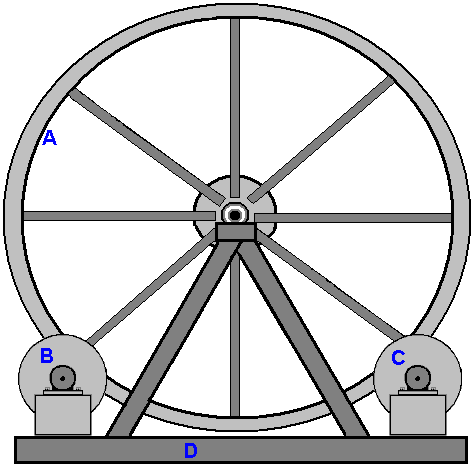 Here, the large flywheel “A” is supported on a triangular frame “D” and smaller flywheels “C” and possibly “B” give the large flywheel a brief push on its way twice per revolution. The target speed of rotation for the large flywheel is just one revolution per second, so this is not an intimidating generator design and it is well within the constructional ability of most people. To be really effective, a gravity-powered generator has to be heavy (and usually, large in size as a result of the weight) and so, although alternative methods can be used, it is normally built in welded mild steel. If you have never built anything in steel, let me assure you that it is not a difficult thing to do, and yes, I have built in steel, starting as a total beginner. However, while mild steel is easy to work and weld, stainless steel is much, much more difficult, so avoid stainless steel. Steel pieces are cut and shaped using an angle grinder like this: 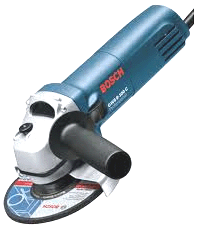 And while the picture shows a handle sticking out of the side of the grinder so that you can use two hands, it is generally more convenient to remove the handle and just hold the grinder in just one hand as it is not heavy. When working steel, wear a pair of “rigger” gloves which are strong, reinforced gloves which will protect your hands from sharp steel edges and always wear eye protection. If you are going to be drilling steel, then a mains powered drill is needed as battery-powered drills are just not up to the job unless it is just a single hole. When drilling steel it is helpful to have an additional hand grip. 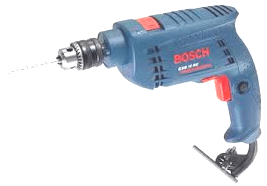 With the drill shown above, the hand grip clamps on to the ring just behind the chuck and can be set at any angle. Steel pieces are joined together by welding. Some welders are quite cheap. Most types can be hired for a day or half a day. It is also possible to shape the pieces and have a local steel fabrication workshop weld them together for you and making a good welded joint takes only a second or two. The really vital thing is never look at a weld being made unless you are wearing a welding visor or welding goggles, as you can damage your eyesight looking at a welding arc without protection. If you decide to buy a welder, then be sure to get one which will run on your house mains supply, otherwise you have to upgrade your house wiring to carry the higher current. This welder would be suitable, and at the start of 2016 it costs only £60 including tax which is about 82 euros or US $90. 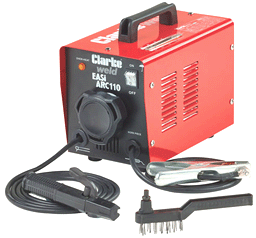 With this “stick welder” the silver clamp on the right is attached to the metal to be welded and a 2.3 mm diameter coated welding rod placed in the black clamp on the left. The stick is then applied to the welding area and the coating on the welding rod becomes a gas cloud, shielding the hot metal from the oxygen in the air. When the weld has cooled down, there will be a layer of oxide on the outside of the joint and so the back of the wire brush is used as a hammer to break up the layer and the wire brush used to scrub the joint clean. However, the most important item of equipment for anyone doing welding work is a protective helmet. There are many different designs and widely varying costs. Many professional welders choose one of the cheapest types which look like this: 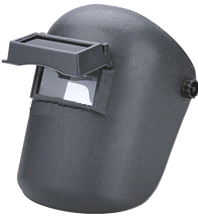 This type has a clear glass screen and a hinged safety filter to allow safe welding. Professionals adjust the hinge tension so that the filter can only just stay in its raised position. The welder then positions the joint pieces in their exactly correct position while looking through the plain glass, and when ready to start the weld he just nods his head which makes the filter drop into place and the weld is started. Never, ever, try welding without proper eye protection The large flywheel which Chas prefers, looks something like this: 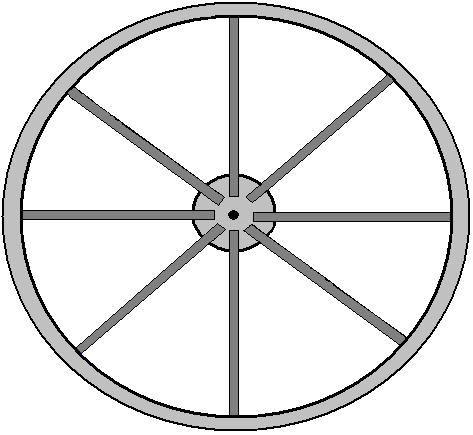 The wheel has a diameter of two metres (six and a half feet) and is a central hub with an axle, eight spokes of 50 x 50 mm steel box section welded to the 200 mm diameter hub and to the rim of the wheel. What is unusual about this design is that the axle bar is stationary and the flywheel rotates around it. However, bearing in mind that some people building this generator will be located where there are no local steel fabrication businesses, Chas has produced a much more simple design which will work well using straight edges like this: 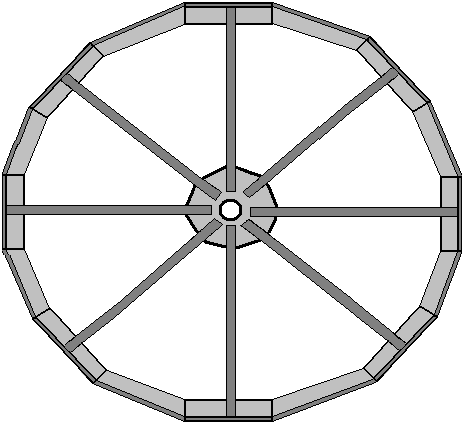 For this construction, each of the eight spokes has a square-cut length of 100 x 100 x 8 mm angle iron welded to it. The angle iron which weighs about 12.276 Kg per metre is shaped like this: 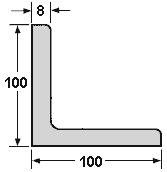 Welding is easy to learn and it is a brilliant method of construction … but it has one major problem. When a joint is made the two pieces of steel melt and merge together. This can happen in a tenth of a second. Don’t put your finger on the joint to see if it is still hot, if it is, then you will get a painful burn and that should remind you not to do that again. That heat is the problem, because when steel gets hot it expands, and when it cools down it contracts. That means that if you were to set up a piece of steel at exactly a right angles and weld the pieces together then as the joint cools down it contracts and pulls the joint out of alignment: 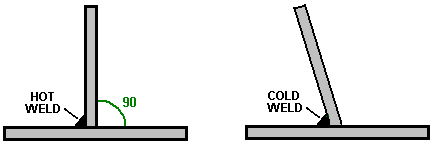 Please don’t imagine that you can just push the vertical piece back into position as that isn’t going to happen because the joint is instantly very, very strong. Instead, you use two quick welds of equal size, with the second one being 180 degrees opposite the first one:  Then, as the welds cool down, they pull in opposing directions and while it produces stresses in the metal, the vertical piece stays vertical. Let the welds cool down in their own good time, taking perhaps ten minutes to cool properly. Do not apply water to the welds to speed up the cooling as that actually alters the structure of the steel and you really don’t want to do that. Metal can be cut quite readily using a cutting blade in your angle grinder but be sure to install the blade so that it rotates in the direction shown on the blade. The blade is likely to look something like this: 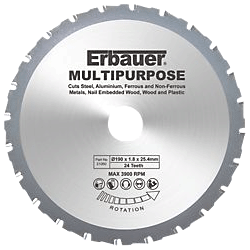 When cutting or grinding always wear protective goggles to make sure that you don’t get a metal fragment in your eye – eyes are not readily replaceable !! If you do get a small steel fragment in your eye, remember that steel is highly magnetic and so a magnet may help in getting the fragment out with the minimum of damage, however, it is much, much easier to wear goggles and not have the problem in the first place. For this generator, we start by making the hub. While a circular shape can be produced using simple tools, there is actually no need and so we can just use straight edges which are much easier to produce. So, for this, we cut a square of metal 350 mm along each face: 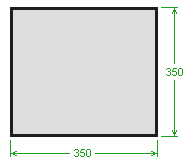 This is an important structural component and so it would be good if the metal was 10 mm thick or even thicker. We need to construct an arrangement where the 2-metre diameter flywheel is supported on two 16010 bearings which have an inner diameter of 50 mm, an outer diameter of 80 mm and a thickness of 10 mm. For this, a length of mile steel pipe needs to be inserted through the hub plate and welded in position at exactly right angles to the hub plate. But, for the moment, back to our square piece of steel which we intend to become the hub plate of our main flywheel. Draw diagonals from the corners to establish where the centre of the square is, then mark a 90 mm square centred exactly on that centre point, and draw a vertical and horizontal line, like this: 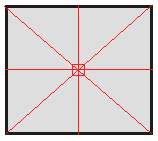 Measure 175 mm out along the diagonals and mark each of those four points. Then, connect those points to make an even octagon: 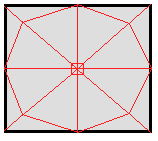 We need to pass a mild steel pipe through the plate in the centre of the square, and we are not going to put in any additional work on the hub plate until we have the pipe in place and its welding is confirmed to be accurate. The pipe is needed to give the thin hub plate stability when rotating around the 50 mm diameter axle shaft, and so, it should be at least 100 mm (4-inches) long when installed. There is a mild steel pipe with 80.78 mm inner diameter and an outer diameter of 88.9 mm and a wall thickness of 4.06 mm. That gives a clearance of just 0.39 mm all around the bearing and allows the bearing to be tack welded directly to the pipe which has a robust wall thickness. Cut a 300 mm length of the pipe and position it carefully in the centre of the square marked in the middle of the hub plate. Draw carefully around it to show the size and position where the pipe needs to go. We now have the difficulty of getting the pipe through the hub plate. With a powerful plasma cutter that would be no problem and the circular cut could be made quite easily, but it is definitely too expensive to buy one for just that one cut, although hiring one and an air compressor for a morning might be an option. With the most simple tools you could cut out the largest possible square in the centre of the circle and then use a round file (and a lot of effort) to cut back the remaining metal to make the required circle. A more crude method is to just cut out a square and settle for welding the pipe at the four points where it touches the hub plate. Remember that the moment the weld is made on one side of the hub plate, the other side of the hub plate needs to be welded immediately and both allowed to cool as slowly as possible to avoid heat shrinkage pulling the pipe out of its alignment with the hub plate. Remember that the hub plate will be hot enough to burn you even if the weld only took a split second to make, so take care. In other words, if the pipe is vertical, then (almost) simultaneous welds need to be made on the top of the hub plate and on the underside of the hub plate. The thicker the steel, the easier it is to weld without problems and the pipe is straightforward to weld with its 4 mm thickness. It takes a great deal of skill to weld steel sheet of 1 mm thickness without tearing a hole in the sheet, but thankfully, that is not something which you need to do with this design. Before welding, we need to stand the pipe piece exactly vertical to the hub plate, with 50 mm projecting beyond the hub plate. This can be done easily with four permanent magnet units intended specifically for this job. They are very powerful and look like this: 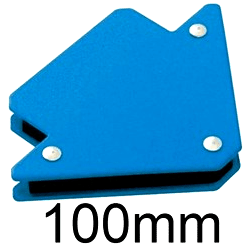 These attach strongly to both the pipe and the hub plate and with one every 90 degrees around the axle, it is held very securely in place, leaving plenty of space for the initial welds. In early 2016, a set of four of these right-angle magnets costs £10 in the UK. Having tack-welded the pipe carefully and quickly on both sides, using welds only 6 mm or so long, and having waited for those welds to cool down fully, make two additional tack welds at 180 degrees to the first two, and then two more pairs so as to have a weld every 90 degrees around the pipe. This leaves you with 50 mm of pipe sticking out of one side of the hub plate and 240 mm sticking out of the other side. We will cut off the excess to leave 50 mm sticking out of both sides. It is surprisingly difficult to cut a circular bar or pipe off at right angles. I suggest that you remove the magnets and mark the 50 mm position and the wrap a sheet of rectangular paper such as an A4 size sheet of printer paper, tightly around the pipe. Make absolutely sure that the paper is tight and aligns exactly when wrapped around the pipe for the full length of the long side of the paper. Mark carefully around the end of the paper and that gives you a clean circular line around the pipe at exactly right angles to the pipe.. Remove the paper and do NOT attempt to cut through the pipe from one side. Instead, make a series of short cuts exactly on the line. Make one cut of perhaps 20 mm, then stop, move on 20 mm and make another 20 mm cut. When you get back to your starting point, continue the process to join up your cuts and remove the excess section of the pipe. If necessary, smooth the end of the cut pipe very slightly with your angle grinder. Do not over do that smoothing and remember to use goggles for both cutting and smoothing. Check your work to make sure that it is square and accurate, as the spokes will amplify any inaccuracies. When When the welds have cooled, remove the magnets, turn the construction upside down, supporting it however you wish – a cheap workmate like this: 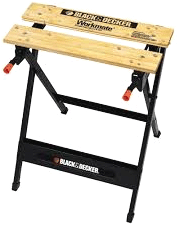 makes a good support for this work and it allows the pipe to be gripped securely while the hub plate is resting horizontally on the bench. The second half of the axle shaft is then positioned very carefully and accurately over the centre of the hub plate, secured with the magnets and tack welded in place. Even though the flywheel will only be rotating once per second, we now reach the most critical part of its construction, namely, checking that the work so far is accurate enough. For this we use two temporary pieces of notched timber clamped in the bench to support the shaft horizontally so that it can be spun. Spin the shaft and watch the hub plate very carefully. The plate should spin with no sideways movement at all. This is essential because the wheel spokes will amplify any error many times. If the result is good, then award yourself a pat on the back. If there is some sideways movement, then scrap the work and start again with another hub plate and piece of pipe. If the work is accurate, then grip the pipe in the workmate and cut off the projecting pieces of the hub plate to form a clean octagon: 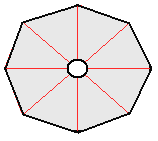 With two spokes welded to the central hub the basic construction will look like this:  The spokes are made with 50 mm x 50 mm steel box section which has good rigidity in all directions. As the overall diameter is 2000 mm that means that the length around the rim will be 2000 x 3.1416 = 6283 mm (if construction is very accurate) and the rim angle iron will have a weight of about 77.13 kilos (170 pounds) which means that in the later stages of building this flywheel most people will need a second person to help lift and manoeuvre it into position. The flywheel weight can easily be increased at any later date by welding additional steel pieces to the inside of the rim – just remember to keep the wheel perfectly symmetrical and balanced around the axle by always matching any additional piece with an identical piece exactly opposite it (that is, 180 degrees away around the rim). When attaching the 50 x 50 mm box sections to the hub plate be sure to align them exactly and clamp them in place very firmly with steel clamps and double check the position before welding them. This is done by drawing accurate parallel lines on each side of the existing lines, 25 mm out, so that when the 50 x 50 steel is clamped in place, those lines show that the positioning is correct. Also, be very sure that you make two opposing welds to avoid the pieces being pulled out of position. So, in the diagram above, when weld “1” is made, then weld “2” is made immediately so that they can cool down together and heat distortion avoided. We now need to work out the length of the strip of angle iron marked as “L” in the diagram above. The overall circumference is 6283 mm and it will be divide up into 16 equal lengths, so each length will (hopefully) be 392 mm long. We start by attaching square cut 392 mm lengths to the ends of the box-section spokes and then cut a template in some stiff material such as 3 mm Medium Density Fibreboard. This is done by sliding the flat template material under two successive rim pieces and marking the shape, showing the angles and lengths involved: 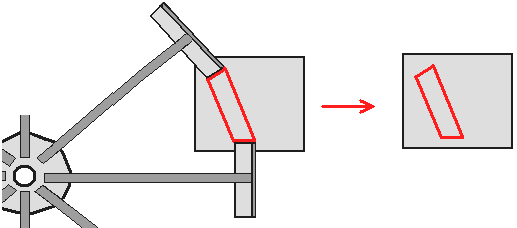 Cut out the template shown in red in the diagram above and check it for accuracy between the two steel pieces to make sure that it is correct before using it to mark the piece of angle iron which will be welded in place to close the gap in the wheel rim. The angle iron has the slanted faces cut and then verticals are marked on the vertical face and those are cut separately. Check the piece in place and if the fit is not perfect, use the angle grinder to make the fit as good as possible. Use two packing pieces above and below, to clamp the angle iron in place aligning it in the horizontal plane, and use robust clamps when doing this: 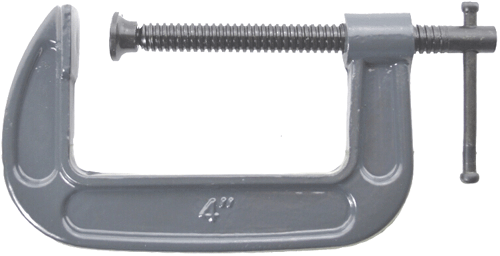 And when the pieces are positioned perfectly make two of the short welds (“1” and “2”) on the vertical faces, and let the welds cool down before making the next of the four pairs of vertical welds: 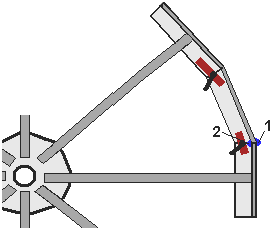 When the welds have cooled down, remove the clamps and packing pieces and make the horizontal welds. You need to make the underside weld and upper weld quickly one after the other. This means that you need access to both faces so that the welding can be completed one immediately after the other. For your first joining piece, the wheel will weight around 50 kilos and that is not a trivial weight to be handling and obviously, as you continue fitting the remaining pieces, it gets progressively heavier. You don’t prop it up high so that you can be underneath it for one of the welds – welding above your head is definitely to be avoided as your head does not enjoy having drops of molten steel landing on it, which is exactly where gravity will direct the molten drops. If you do prop it up at waist height, then stay well to one side when making the underside weld. One possibility is to stand the partially completed wheel upright, so that the underside face becomes a vertical face. The wheel is already a fairly robust construction, but it would be no harm to support it on a rod through the hole in the centre of the hub plate if you are choosing to do all of the welds on a vertical face. The flywheel is completed by inserting the bearings into the ends of the pipe, making sure that they are exactly flush with the end of the pipe and applying two pairs of spot welds to each bearing. The bearings end up with four spot welds spaced at 90-degree positions: 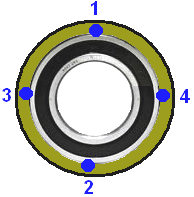 There are a few additions to be made, but this is the basic wheel which forms the heart of the generator. The overall easy-build flywheel (roughly sketched) looks like this:  Please remember that when completed, this 2-metre diameter flywheel weighs more than 80 kilos and so to raise it into a vertical position means that you have to lift 40 kilos. While that is by no means impossible, it would be much more convenient to have two people lifting and manoeuvring the flywheel into position, if that is possible The additions to this large flywheel are two pressure strips which are used to drive the main flywheel. The power for the complete system is supplied to one, or preferably two small flywheels and those flywheels which are easy to spin, pass a thrust to the main flywheel each time that they encounter a pressure strip. As a general rule, (provided that you are not building a space drive) you always keep a flywheel balanced, and so, if you attach something on the right hand side you should attach an equivalent weight on the other side to keep the flywheel balanced. We have the option to add one drive strip and a counterbalancing weight opposite it, or to have two drive strips positioned 180 degrees apart. With one drive strip and one small flywheel, the main flywheel gets one drive pulse once per revolution. With one drive strip and two small flywheels the main flywheel gets two drive pulses per revolution. With two drive strips and one small flywheel, the main flywheel gets two drive pulses per revolution. With two drive strips and two small flywheels the main flywheel gets four drive pulses per revolution. The main flywheel drive is caused by making each small flywheel press a rubber-covered cylinder against a rubber-covered steel strip attached to the large flywheel. The additional strips are arranged like this: 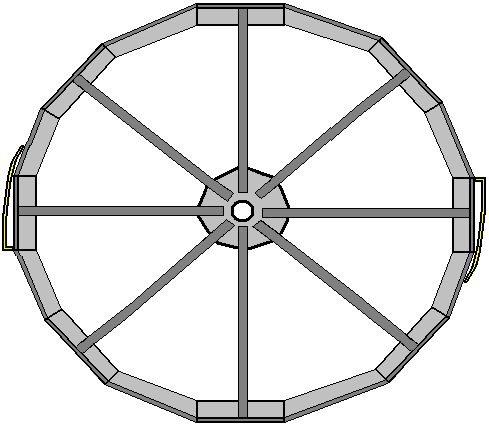 The final detail is something which will prevent the flywheel sliding along the stationary 50 mm diameter axle shaft, which it will do if the axle is not exactly horizontal. If the axle shaft is even 1 degree off the horizontal, the flywheel will keep edging towards the lower end. It is possible to stop the movement with a collar on both sides of the flywheel, Those collars are nice and cheap in the common small sizes but at a 50 mm inner diameter they are very expensive, and the continuously rotating flywheel will be pressing against the stationary collar, causing friction and wear. A suitable way of dealing with this is to use a 51110 size end-thrust bearing like this: 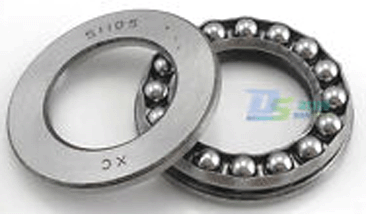 This allows the flywheel to rotate freely even if the axle shaft is not quite horizontal. It is just necessary to lock the outer sides of the two end-thrust bearings to the stationary axle and that can be done cheaply and effectively using a hosepipe clip also known as a Terry Clip or a Jubilee Clip: 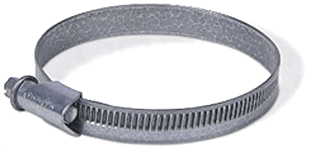 Just position the tightening bolts 180 degrees apart even though the whole clip is light. All right, that is the first way to build the main flywheel and it is the method preferred by Chas, because he lives in an area where there are steel fabrication workshops with experienced welders and professional tools and equipment. However, many people live where there are few facilities and where the Customs charge exorbitant fees which can triple the cost of anything delivered through the postal service. So, here are two other ways of building the flywheel which may be more suited to areas where the conditions are more difficult. The first method is very much the same, building in welded steel, but this time we will assume that the nicely sized steel pipe is not available. There are various ways around this problem, but probably the easiest is to attach the 50 mm diameter axle shaft directly to the hub plate and let the axle rotate along with the flywheel. For this, we set out and mark up the hub plate as before:  But this time around, the central square is 50 mm in size, and both sides of the plate are marked to produce that exactly centred square. The axle shaft is cut into two equal lengths, but we use the factory machine-cut end and position it in our central square, using four of the magnets to hold it exactly perpendicular to the hub plate. We make two quick welds on opposite sides of the axle, attaching it to the hub plate, positioning the welds half way between the magnets. When the welds have cooled, we make two more quick welds so that the axle is attached at 90-degree positions all around the shaft. When the welding has cooled down completely, remove the magnets and turn the piece over, clamping the attached axle section in the workbench to hold the hub plate steady. Position the factory-cut end of the second axle piece exactly in the centrally marked box and use the magnets to hold it exactly vertical. Again, two pairs of quick welds are made to attach the axle to the hub plate. When everything has cooled fully we need to check to see if the result is usable. For this, support the two axle pieces in a piece of timber with a V-notch cut in it. That is, the axle is positioned horizontally, supported near each end in a notched piece of timber. Spin the axle and watch the hub plate very carefully as it spins around. If the hub plate stays steady and doesn’t wobble, then your work is excellent and ready to progress further. If the plate wobbles, then scrap it and start again as you will never make a satisfactory flywheel with that plate forming the hub. Every alignment error will be magnified many times at the rim of the flywheel due to the length of the spokes. The rest of the flywheel construction is the same except that the 50 x 50 mm spokes are not welded to the hub plate, but instead are bolted there using two 10 mm diameter bolts per spoke. That allows the hub plate and axle to be removed from the flywheel to make things easier if you need to transport the flywheel to a new location at a later date. It is perfectly possible to transport the whole generator fully assembled, using the sort of lorry which transports building blocks for new houses. The only other difference for this style of build is that the two bearings are positioned on the support frame rather than being part of the flywheel itself. The third way of building the flywheel is for places where steel is not readily available. You might think that building in timber is not nearly as good, but surprisingly, it is a very successful way of constructing a heavy flywheel. For this construction we use standard sheets of chipboard, blockboard, or Medium Density Fibreboard. In metric areas of the world, these sheets are 2440 x 1220 mm in size. In American areas the sheets are 8 x 4 feet in size. We need to cut several semicircles from these sheets, and I would suggest using 20 mm thick (or failing that, 18 mm thick) sheets. These semicircles will be attached together to form a solid circular flywheel of any thickness we wish. Different varieties of wood and laminate sheets vary very considerably in weight, but a two meter diameter wood disk of 80 mm thickness is likely to have a weight of 90 kilos (200 pounds) and there is no reason (other than cost) why the thickness should not be twice or three times that 80 mm thickness. It also has the advantage that additional layers can be added at any later date if you want the flywheel to be heavier. I suggest that a timber lath is used for marking the sheets. It is necessary to have the lath pivoted at the exact edge of the sheet and so a nail can be used as the pivot for the marking lath but remember that the nail needs to be inset into the side of the sheet for half the nail depth:  The lath then fits exactly on to the nail which forms a fixed and steady pivot point. The lath has holes positioned at 40 mm and 1000 mm in from the centre of the nail. These holes are only just large enough to pass the tip of a pencil through them: 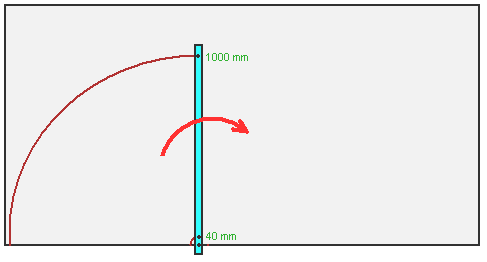 This marks the board out for it to become half of a 2-metre diameter disc with an 80 mm central hole ready to take the two 80 mm diameter 16010 bearings. 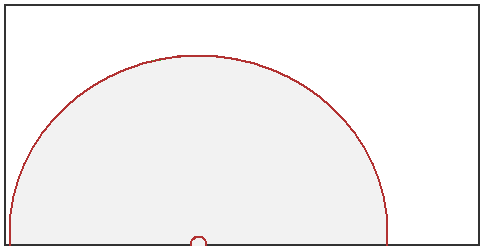 Two of these semi-circular boards are assembled with the join vertical and the next two are positioned on top of those with the joint vertical to give the maximum supporting effect between the components. To cut out a component that large, the easiest tool to use is a power jig saw, or if necessary, a drywall saw: 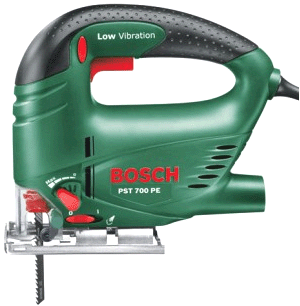  No matter what tool is used, don’t rush through the cut but take your time and make a good clean and accurate cut. The disc components can be held together by bolts and/or they can be set into a cohesive whole by using one of the boat building epoxy resins which can be mixed in large volumes and easily spread across the whole face of the components, provided that the workplace temperature does not fall below 5 degrees Centigrade for several hours after the epoxy mix is applied. Other wood glues could be used if the epoxy is considered too expensive.  The bearings are placed exactly aligned with the outer disc and secured in place with epoxy resin or other suitable glue for a steel-to-timber strong joint. The glue is applied the whole way around the outer ring of the bearings and that concludes the Flywheel construction, making the equivalent of the metal flywheel first described: 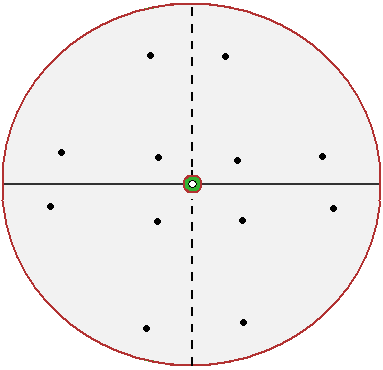 The next step is to build the base support for the generator, and that support is mainly for the large wheel. If you are working in steel, then it is constructed by welding together some pieces of box steel to form a shape like this: 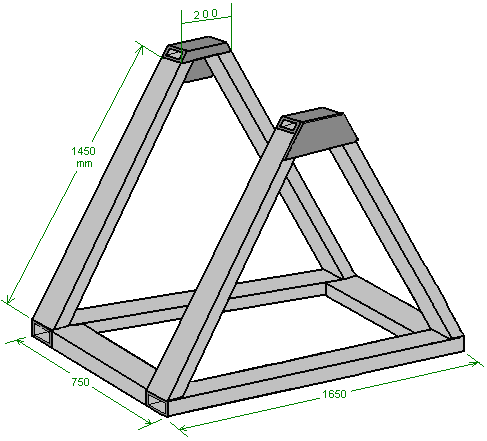 If working in timber, keep the same overall size of the components (which are solid timber) and be sure to make the two triangular parts very robust with both epoxy and screw attachments for each join. Otherwise, we start by constructing the base using steel “channel” which is a box section material. The size we want is 100 x 50 mm which is (4-inch x 2-inch as there are 25.4 mm in one inch) and we join two 1650 mm long pieces using two 550 mm long pieces to form the base rectangle: 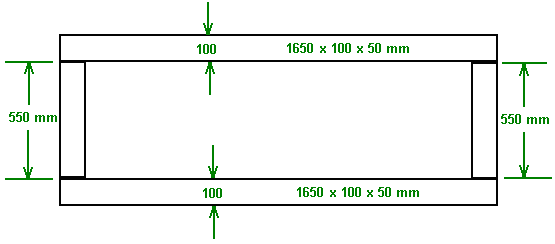 It is not at all easy to take a welded joint apart, even if that welded joint took only a tenth of a second to make, so it pays to get the job done exactly right every time. Place the two pieces to be joined on a flat surface such as concrete (which is not flammable) and get them in exactly the right position. Then weight them down so that they can’t move. Then, and only then, weld them together. Probably the most difficult thing about welding is the fact that it is very hot and the heat makes the metal expand. I suggest therefore, that you make a short weld of perhaps 20 to 25 mm long and then stop and wait for that weld to cool down before welding the next short length. If you have a long weld to do, then weld the start. Let it cool. Then weld the end. Let it cool. Then weld the middle and let it cool. Those welds hold the piece securely against further movement as you gradually fill in the distance between those first three welds with short welds, letting each one cool before making the next weld and spacing those welds apart as much as possible to let each weld area cool as much as possible between welds. When the main base is completed, two additional pieces 550 x 100 x 50 mm are welded in place as shown here: 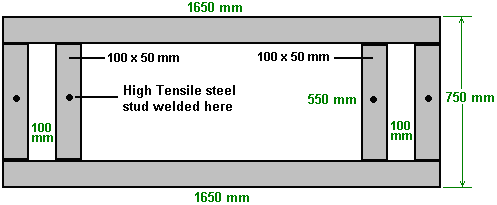 Also, a strong threaded stud is welded in the middle of each of the cross pieces. A stud is effectively a threaded bolt without a head, and where the head would have been is welded to the base members as shown above. These studs are like those used to attach car wheels and in this application they are there to allow something to be bolted to the base. One of the things bolted to the base is the alternator. Chas used a “Genelite” 3.5 kilowatt alternator which is a single-phase, 220 volt, 50 Hz unit which needs its shaft to be spun at a nominal 3000 rpm in order to generate the normal mains voltage and frequency. As the flywheel spins at just one revolution per second, Chas uses three V-belt pulleys (shown in blue) to generate the wanted shaft speed on the alternator. In his area, the pulley sizes are specified in inches and he uses 16 inch driving 4 inch. Followed by 12 inch driving 4 inch. Followed by 14 inch driving a 3.25 inch diameter pulley on the alternator shaft. That gives ratios of 4:1, 3:1 and 4.3:1 which combine to drive the alternator shaft at 51.6 revolutions per second which is 3096 rpm. The large flywheel and pulleys are mounted on the support frame and look like this: 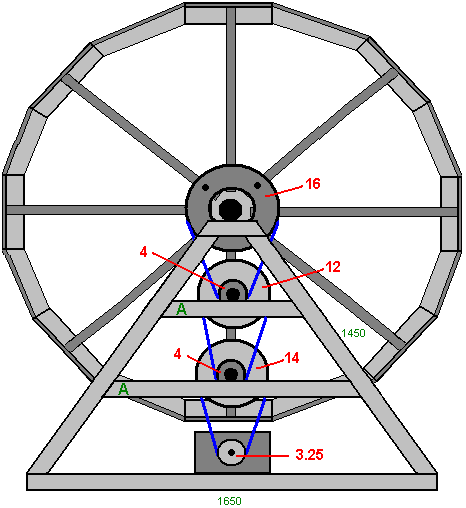 To support the intermediate pulley axles, additional support members “A” are added to the inside of the frame to support the additional bearings or “pillow blocks” which form the mounting for the additional pulley axles. For Chas’ design and the solid wood version where the main flywheel axle is stationary and the flywheel rotates around that stationary axle, the largest pulley (16 inch diameter in Imperial units or 450 mm diameter in metric units) is adapted so that it doesn’t touch the axle and is bolted directly to the flywheel, using spacers to align it with the pulley train below it. The pulley is larger than the flywheel hub and so needs to be attached to four of the spokes. In the version where the 50 mm diameter axle rotates, the largest pulley is available with a 50 mm central boss and so it can be attached directly to the axle in the required position. Where your pulleys are bought depends on where you live. One such supplier is www.bearingstation.co.uk but there are many similar suppliers around the world. While the diagram above shows the gear train from the flywheel to the generator in a logical vertical alignment, there is no particular need to do that and the drive train can zig-zag if you wish. As long as the flywheel continues to rotate at its one rotation per second, the generator shaft will spin at 3000 rpm (or perhaps slightly faster than that) and the system will output continuous AC electricity which can operate power tools, lights, heaters, refrigerators, etc. This is a continuous system which can operate at all times, day and night. It can charge a bank of lead-acid batteries, but lead-acid batteries are only 50% efficient and so they waste half of the power that you feed into them, so if you feed 10 amps into your lead-acid battery for 10 hours, your battery will only be able to provide 5 amps for 10 hours, and there seems little point in throwing away half of your generated power, quite apart from the fact that the batteries are heavy, expensive and will need to be replaced every four years or so. So, we need to keep the flywheel spinning and do that with as little power as necessary. In this design, the main flywheel is made to spin by a rubber covered drum pressing briefly against a rubber covered ramp attached to the main flywheel. As we want to keep the flywheel balanced, we actually attach two ramps to it, spaced out so that they are exactly opposite each other, that is, at 180 degrees apart. That means that the large flywheel receives two thrusts per revolution. The arrangement looks like this: 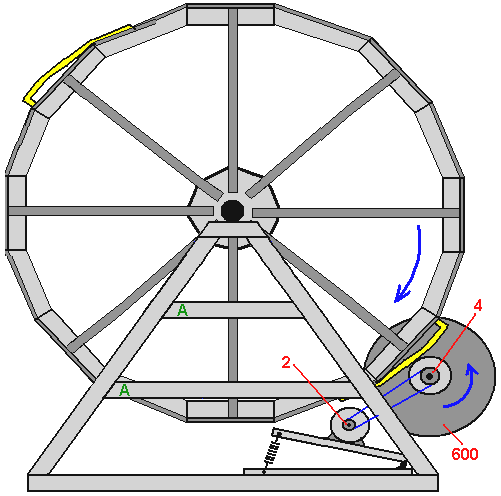 This diagram shows only one drive motor and while the system will work with one motor it is more powerful with two and so an identical unit can be mounted on the left hand side of the support frame. The motor used by Chas is the Australian built CMG one-horsepower AC mains motor which runs on 240 volts 50 Hz, at 1410 rpm, drawing 750 watts under full load and has a 5/8 inch (16 mm) drive shaft which has a 2-inch diameter pulley mounted on it, connected to a 4-inch diameter pulley on the small flywheel. The motor is mounted on a hinged plate with a spring pulling the plate away from the small flywheel. The main reason for this is to allow the small 600 mm diameter flywheel with its 180 mm diameter rubber covered drive cylinder, to move outwards slightly when it comes in contact with the drive ramp attached to the large flywheel. This is effectively an automatically adjusting arrangement As you can see from the diagram, the main flywheel rotates clockwise while the 600 mm diameter flywheel rotates counter clockwise. If you wish that they went around in the other direction, then just walk around to the other side of the generator and your wish is magically granted with the main flywheel going counter clockwise and the small flywheel going clockwise !! The current drawn by the drive motor (or motors) is far less than their full working load current draw of 4.5 amps, probably around 2.2 amps. Chas also reduces the current by switching the supply to the motor and allowing 3 seconds of current flow followed by two seconds with the motor disconnected, where the shaft rotation is driven by the momentum of the small flywheel. Chas achieves this switching by gearing down the movement of the main flywheel to give one rotation in five seconds. While that works, it is a mechanical switch which has one fixed setting and is subject to wear as time goes by. I suggest that there is no gearing down, but instead that the current flow to the motor is controlled electronically, using an ordinary light dimmer switch which is available in powers up to one kilowatt and which allows continuous adjustment of the current so that the most effective current flow for the motor can be set by the turn of a knob and no moving parts are involved. We come now to the construction of the drive ramps and driving cylinders. Ideally, we would like both to be covered in rubber so that there is good traction and the minimum of noise as the main flywheel is driven around. If you live in an area where there are lots of workshops, you may be able to get these components covered in vulcanised rubber. If no such facilities are available, then perhaps cutting up an old car tyre might be a good alternative. While the temptation is to use your angle grinder with a cutting blade, that is probably not a great idea as the speed of the blade is liable to melt the rubber and make a good deal of mess. So, slower cutting is an advantage and perhaps an ordinary hand saw like this: 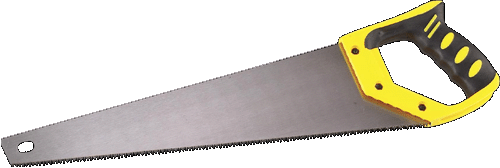 might work well when cutting the tyre. If building in steel, making the curved ramp is not the easiest thing to do. You need a strip of steel which is not thicker than 3 mm and ideally, thinner than that if it needs to be bent into a smooth, even curve. Chas recommends that the ramp is one inch (25 mm) higher than the rim of the large flywheel at the trailing end of the ramp. The idea is that the leading edge of the ramp passes easily underneath the drive roller, but contacts it after a few inches as the flywheel rotates, transferring energy from the small flywheel and its motor to the large flywheel. The rubber strip needs to be attached very securely to the ramp. If possible, epoxy resin covering the whole of the ramp surface and mating with the cleaned and roughened inner surface of the rubber strip should give a good grip. Further strengthening of the bond is given by bolting the rubber to the raised, trailing end of the ramp as that is the point of greatest stress:  It has been found that the 180 mm diameter rubber covered drive wheel works better if it is filled with lead. The curved drive strip has an optimum length of 900 mm determined by experimentation, and two bracing blocks are glued in position at the one-third and two-thirds of the length, to prevent any flexing of the strip when the roller is pressed against the strip. When the unit is completed, the alternator is disconnected electrically in order to make it the minimum possible drag on the flywheel and then the small flywheel or flywheels are got up to speed, either by connecting to the mains or by connecting to an inverter powered by a battery. Then the large flywheel is spun in the correct direction by hand and when the large flywheel gets up to speed, the alternator output is switched so as to power the motors and the other electrical equipment which is to be powered by the system. Chas has a preference for using two drive motors and four evenly spaced drive strips. This gives a balanced flywheel and a more powerful thrust to the main flywheel four times per revolution, unless you wish to consider each thrust as a separate item, in which case, there are 8 thrusts per revolution. However, two thrust strips and a single motor will certainly generate excess power and the system can be upgraded with extra strips and/or a second motor when there is finance for that type of upgrade. The 600 mm diameter flywheels weigh 109 pounds (50 Kg) each with most of the weight positioned around the rim. It is quite possible that if the alternator output power is connected to the drive motors and no other load, that spinning the main flywheel by hand would be sufficient to get the system running. An alternator is very much like a bicycle dynamo in operation as electricity is produced by moving coils through magnetic fields. In the case of an AC alternator used here, if the rate of rotation of the alternator drive shaft is lower than expected, then the alternator output voltage will be lower than it is at full speed, but it still can produce considerable voltage. Most drive motors are capable of working with a much lower voltage than they are supposed to have and that means that the drive cylinders can progressively build up the speed of the small flywheels which in turn can help the manual spinning of the main flywheel until the system progressively works up to its full operational speed. The electrical connections are very simple. The mains connection is fed to the drive motor through a 2-pole, 10 amp, changeover switch so that the supply can be switched from the mains to the generator output when the flywheels are spinning at their normal speed. For additional control of speed, a 1 kilowatt light dimmer switch can be placed between the switch and the motor. Contact breakers should also be used and the generator output should have an On/Off switch as well. This gives an arrangement like this:  In the position shown, the Generator is feeding current to the drive motor “M”. The 15-amp circuit breaker protects the generator “G” from a short-circuit anywhere else in the circuit. The 5-amp circuit breaker protects the 1-kilowatt dimmer switch and the Motor “M”. With the switch in the other position, the mains (or the output from a battery powered inverter) is fed through to the motor when the system is being started. In May 2017 Chas decided to add some additional information on more powerful versions of his motor-powered generator. For this design, the flywheel is mounted horizontally instead of vertically. The flywheel design remains the same: 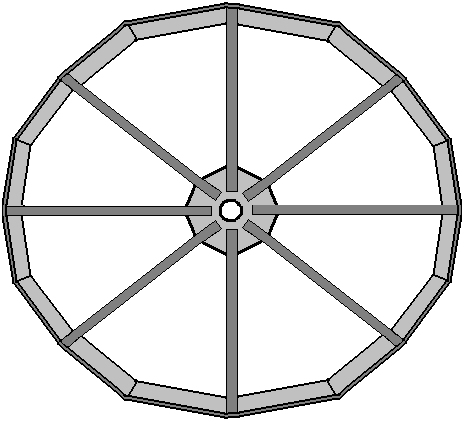 but in this case, the overall weight of the flywheel is increased by bolting concrete blocks to the inside of the rim of the flywheel, making a 2.0 metre diameter flywheel weigh 800 pounds and is suited to a 10 KVA (8 kilowatt) generator. A 2.5 metre diameter flywheel weighs 1200 pounds and is suited to a 25 KVA (20 kilowatt) generator. Concrete is used as it is both heavy and cheap and it can be attached to the rim using long bolts: 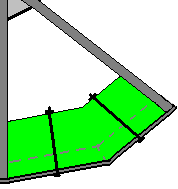 The weighted flywheel is mounted on a vertical shaft but not attached to it. That is, the flywheel is free to rotate around the stationary vertical shaft which is mounted on the central concrete plinth set in the ground. The base construction has three separate arms radiating from the central point, both to give stability and to provide mounting points for the three drive motors, each of which has its own smaller flywheel: 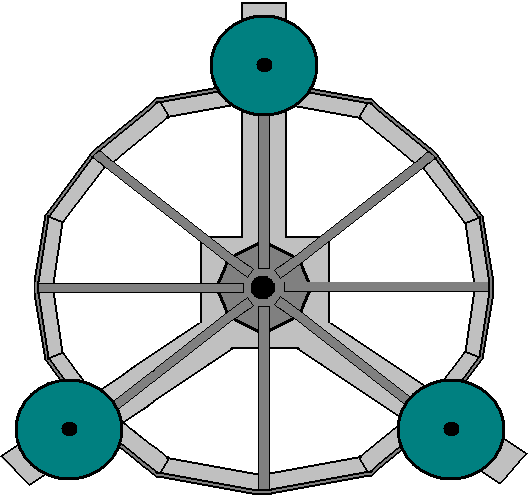 The central shaft is bolted to the centre of the concrete support pad and it has a 16-inch pulley wheel bolted to it: 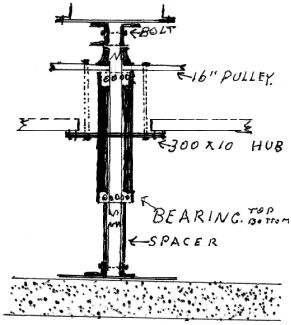 Interestingly, there is no direct drive to the main flywheel. Instead, a strip of steel faced with rubber is used: 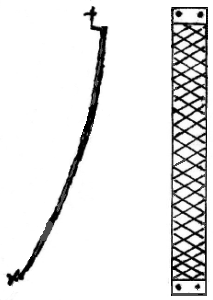 This strip is bolted or welded to just one point on the rim of the main flywheel like this: 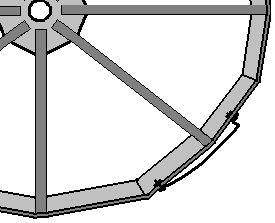 This strip forms a ramp which edges gradually outwards from the rim of the flywheel and it connects with a drive wheel mounted on the shaft of each of the small flywheels: 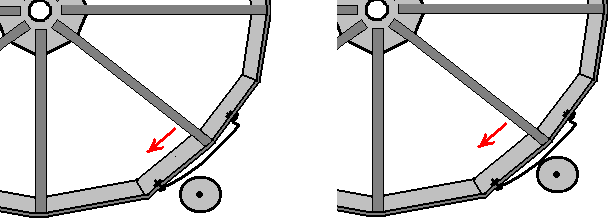 Because of the positioning of the three small flywheels, this arrangement gives the main flywheel three drive pulses per revolution, but each of the small flywheels provide only one drive pulse per revolution, and each of the drive pulses are only of very short duration: 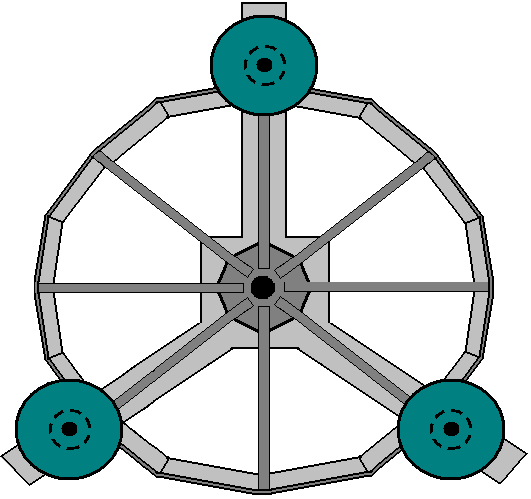 This design feature produces a system which uses impulse power very efficiently, keeping the main flywheel rotating steadily even though it is driving a substantial alternator and providing output electrical power. The input power requirement for this is 2.2 amps for each motor drive, giving a total of 6.6 amps at 240 volts. Once the main flywheel gets up to its running speed of 60 rpm, it is able to supply that input power plus a great deal of excess electrical power as free-energy. The three foundation arms are made of cast concrete with two rectangular steel box section channels mounted on top of each one. The drive motors are mounted on a section of angle steel attached to one of the box sections:  The motor rotates at 1400 rpm and it is geared using two pulley wheels so that its small drive cylinder rotates at about 700 rpm. The diameter of the drive cylinder needs to be selected so that the main flywheel rotates at 60 rpm, and that depends on the diameter of the main flywheel which may be 2.0 m, 2.5 m or some other diameter which suits your needs. For example, if the main flywheel radius (measured to the outside of the rubber-faced drive strip) is 1300 mm and rotating at 60 rpm then the rubber drive strip is moving through a distance of Pi x 2600 mm per second. Consequently, the drive strip surface needs to move through the same distance, which for it is Pi x d x (700 / 60) mm if it is rotating at 700 rpm and “d” is the diameter of the drive cylinder (measured to the outside of the rubber facing). So, 2600 = d x (11.67) or d = 222.9 mm which is 8.77 inches. However, there is a variation in daily temperature and the main flywheel will physically increase in diameter as temperature rises. The increase in diameter is not great but in spite of that we need to allow for it. Chas has chosen to mount the drive flywheels on a spring-loaded mechanism. The movement distance does not need to be large, say half an inch or 15 mm or so. There are various ways of arranging this and the method suggested by Chas involves mounting each of the small flywheels on a hinged plate and using a spring to allow a small movement when the flywheel is pushed aside by the friction drive band on the main flywheel:  The concrete base is like this:  And mounted on top of this base are three pairs of steel box sections as shown here:  The alternator which provides the output power from this generator system is driven by a belt and pulley system from a 16-inch pulley mounted on the main flywheel which is rotating at 60 rpm. The size of the alternator which you are using determines the vertical dimensions of the whole flywheel structure. The alternator is mounted on a steel frame like this:  And the steel frame is mounted vertically, supported on angle irons attached to the steel box sections on the concrete base. When attached securely in position, vertical angle irons are erected from the two base members to allow the mounting of two additional pivots for the three drive belts which provide the step-up gearing for driving the alternator at just over 3000 rpm: 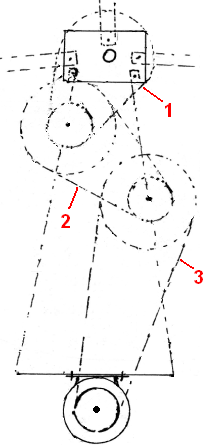 The vertical positioning of these extra two additional pulley mounts and the height of the 50 mm diameter central flywheel shaft, is determined by the physical size of the alternator used to generate the electrical output. When the construction work has been completed, the entire generator is encased using panels attached to posts surrounding the structure. This give weatherproofing as well as keeping children and blown debris away from the generator. There needs to be an access flap in the housing so that the main flywheel can be given a manual spin for starting. There is only one direction of spin as the lowest part of the drive ramp on the main flywheel needs to approach the drive motors first. Patrick Kelly http://www.free-energy-info.tuks.nl http://www.free-energy-info.com http://www.free-energy-info.co.uk http://www.free-energy-devices.com |